Search This Blog

28 Apr 2011

Filters in Photoshop


Filters are used to change the appearance of an image, layer or selection in Photoshop. In this tutorial, I’ll introduce you to some common filters, and show you how to use them.
For me, filters in Photoshop are sort of like those special effects you can add to home videos with those consumer handheld video cameras — easy to use, but they certainly have their place in design. That said, there are plenty of ways to get creative using filters, so they are definitely worth understanding in Photoshop!

Using Filters from the Filter Gallery

Photoshop’s Filter Gallery is basically a one-stop place for working with filters in your documents. In the Filter Gallery, you can browse through many different types of filters, apply them individually to your image, or even stack them on top of one another like you would with layers. You can get to the Filter Gallery by going to Filter > Filter Gallery.
Here’s a quick overview of the Filter Gallery:
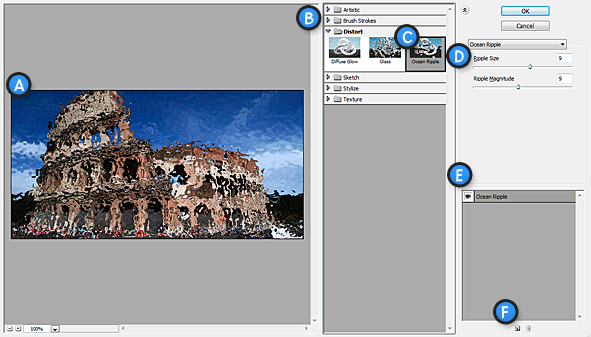
Photoshop\'s Filter Gallery

Filter Gallery Interface

A. Filter Preview
B. Filter List (Note: You can show or hide this list by clicking the arrow icon to the top right of it)
C. Currently Selected Filter
D. Filter Options
E. Effect Layers
F. New / Delete Effect Layer
The Filter Effect Layers work just like ordinary filters in Photoshop, and can be dragged and dropped on top of one another for desired results.
Applying a filter from the gallery is very easy to do. Simply Click on a filter, adjust it’s options to your liking, and click OK to apply. To stack multiple filters on top of one another, just hit the New Effect Layer (‘F’ in diagram above), and select another filter. You can expand filter types by clicking the folders in the filter list.
Apply a filter from the filter gallery
The Cutout Filter quickly transforms a photograph into an abstract piece of art.

Quicker Access to Filters

The Filter Gallery is really just a browser of sorts. If you know exactly what kind of filter you want to use, you can access it directly from the Filter menu in Photoshop to speed things up.

Using Other Filters

Not all filters in Photoshop are available through the Filter Gallery. Many of them must be accessed directly through the Filter Menu, and have unique interfaces and options of their own.
We’re not going to go over every individual filter in this tutorial (doing so would take a very long time), but I highly suggest doing some experimentation on your part with different filters to get an idea of what some of them do.
Let’s look at some of the more common filters used frequently in design.

Blur Filters (Filter > Blur)

The Blur Filters are useful in lots of situations. 
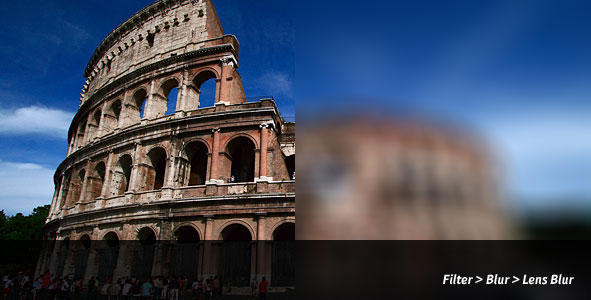
Create a realistic Lens Blur in Photoshop
The Lens Blur Filter makes it very easy to create a realistic lens blur effect in Photoshop.

Noise Filters (Filter > Noise)

Noise Filters are great for adding, or reducing noise and grain in photographs. You may find filters such as the Reduce Noise Filter extremely useful if you work with old, damaged, or dusty photographs that need repair work done to them. The Add Noise Filter can also come in handy, and has some creative applications of its own.
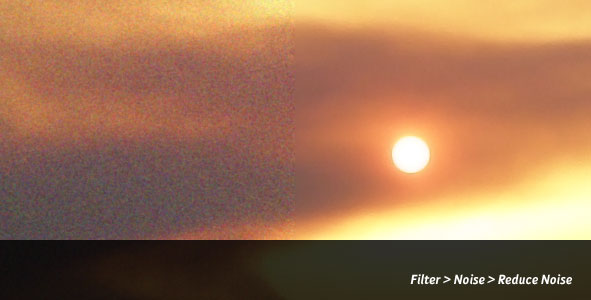
Reduce Noise in a Photograph with the Reduce Noise Filter
Noise can easily be reduced with the Reduce Noise Filter in Photoshop.

Sharpen Filters (Filter > Sharpen)

The Sharpen Filters are also great for correcting imperfections in photographs, as well as putting emphasis on important elements in a design. When working with blurred images, a sharpen filter can be used to clarify and better define edges by increasing contrast between pixels.
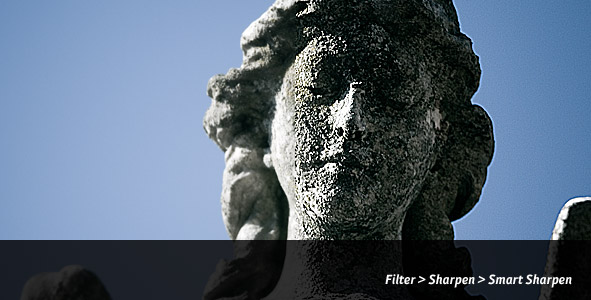
Sharpening a Photo with the Sharpen Filter
The Smart Sharpen Filter used to sharpen a photograph of a statue.

Filters Disabled?

While all filters are available to be used on 8-bit RGB images, many will be unavailable if working with other color spaces, 16-bit, or 32-bit documents. Filters will also be unavailable for use in Bitmap and Indexed-color documents.
If you’re not able to use filters, you may need to go to Image > Mode, and make sure you’re set to RGB, and 8 Bits/Channel, although some image data may be lost.


Posted by David Leggett in Photoshop Tutorials on June 04th, 2008

Layer Styles in Photoshop


Effects can be added to individual layers in Photoshop that automatically change as a layer is modified. The combination of effects on any given layer is called its Layer Style. We’ll teach you how to use and make your own layer styles in this tutorial.

What are Layer Styles?

Note: If you’re trying to find out how to install layer styles, please see our tutorial on Installing Layer Styles in Photoshop.
Layer styles are special effects that can be quickly and easily applied to individual layers in Photoshop to drastically change the appearance of something in very little time. They can be preset, customized, or even saved and used for later.
One of the useful properties of Layer Styles are there relationship to the layer contents. Since the style is actually a separate entity that is just linked to the layer, it will continually update itself as a layers contents are edited or moved. Furthermore, the effects can easily be adjusted after applying them, making them non-destructive in nature.
Using Layer Style Presets
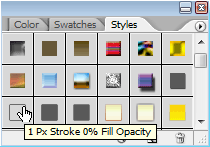
Layer Styles Palette
Photoshop comes packed with a good number of Layer Style Presets, all which are accessible through the Styles Palette (Window > Styles). To apply a Layer Style, select the Layer you’d like to work with in your document from the Layers Palette, and then select the Layer Style which you would like to apply.
Example of a Preset being applied to a layer
A Text Layer Before and After a Layer Style Preset is applied to it.
Applied Layer Effects
After applying a Layer Style, the effects in the layer can be seen, adjusted, disabled or reenabled from the Layers Palette. Layers with effects applied to them will have a small round icon with an ‘f‘ in it. To expand or collapse the effects applied to a layer, click the arrow to the right of this icon.
When a layers effects have been expanded, you can quickly disable specific effects within the layer style by clicking the eye icon next to the effect. Just like a layer, these effects can become visible again by clicking the blank area (where the eye would reside) when an effect is disabled.

Making Quick Changes

You can make quick changes to a layers style by double clicking the ‘f‘ icon to pull up the Layer Style Options. From here, you can completely customize your layers style.

Creating your own Effects and Styles

To add your own layer effects, and create your own styles, go to Layer > Layer Style > Blending Options, or Right Click your Layer, and select Blending Options. This will bring up the Layer Style Options.
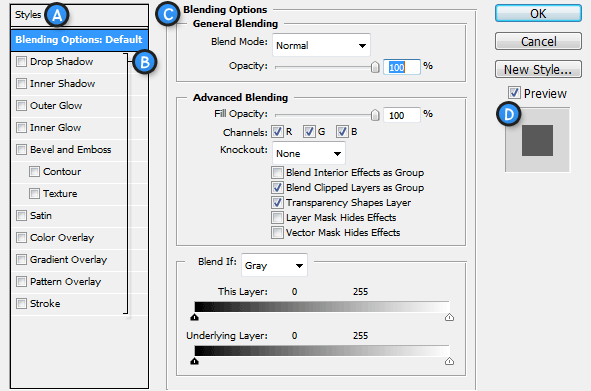
Layer Style Options
A. Style Presets – List of the Style Presets.
B. Effects – The various effects that can be used in a layer style. It’s important to note that by clicking on the name of any of the effects will enable that effect, and display the options for the individual effect.
C. Options / Settings – When the name for an effect is checked, it’s options will be shown here. When Blending Options is selected, settings such as Opacity, Fill, and other advanced options will be displayed.
D. Layer Style Preview – A preview of the Layer Style.
Effects (B) can be enabled by checking them, and likewise, disabled by unchecking them. To edit an effect, you need to click the name (rather than checkbox). The effects settings will be displayed in the Options area (C), where they can be easily adjusted. To apply a set of effects and options, simply press OK.

Layer Effects

Styles can be built with the following effects:
  • Drop Shadow – Creates a shadow behind the layers contents.
  • Inner Shadow – Creates a shadow on top of the layers contents.
  • Outer Glow - Creates a glow behind the layers contents. Cannot be distanced like the drop shadow.
  • Inner Glow – Creates a glow on top of the layers contents. Again, cannot be distanced like the inner shadow.
  • Bevel and Emboss - Used to create unique highlight and shadow effects on a layers contents.
  • Satin - Gives the layer contents a satin-like, glossy appearance.
  • Color Overlay - Fills the layer contents with a solid color.
  • Gradient Overlay - Fills the layer contents with a gradient.
  • Pattern Overlay - Fills the layer contents with a pattern.
  • Stroke - Creates an outline on layer contents using a solid color, gradient, or pattern.

Give it a Try!


Let’s try it out to make sure we’ve got a clear understanding of all this. We’re going to test our abilities by creating a basic layer style for some text. Go ahead and create a new document in Photoshop, and use the Type Tool to add some large, black text.
Right Click the text layer, and Select Blending Options.
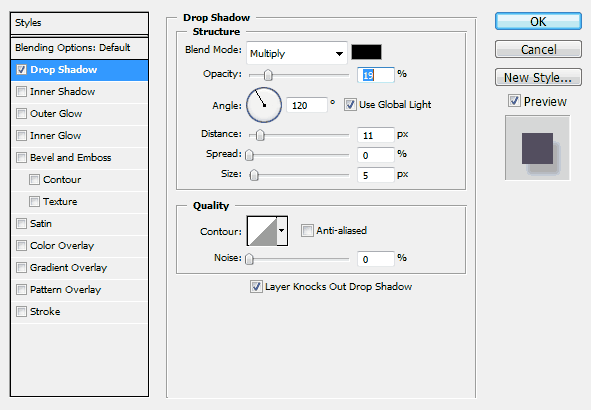
First we’re going to add a Drop Shadow. Check the Drow Shadow Effect, and click on it to bring up it’s options. Set things up as shown in the diagram below:
Add a Drop Shadow
As you’re making adjustments, you should be able to see changes being made in your actual document. Keeping an eye on your document while adding effects will allow you to better determine how to adjust settings.
You should be familiar with most of these sliders and types of settings from our Palettes Tutorial you may have read. The Angle setting may be a new one to you, but it’s very simple to work. You can either enter in a numeric value, or adjust the angle with your mouse by clicking on the wheel. Doing so will change the angle of your shadow.
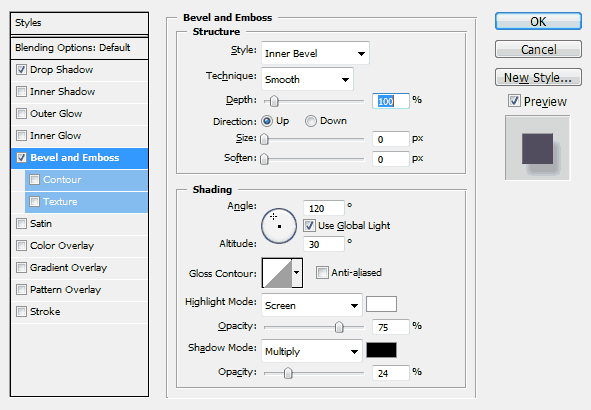
Now let’s add a Bevel and Emboss. We’re going to create a bevel that is subtle, so that it doesn’t draw too much attention, but at the same time pops our text a bit. Again, mimic the settings shown in the diagram shown below.
Add a Bevel to your Text
Nothing really new here. You may want to experiment as I suggested earlier to have a better understanding of the different settings here, but most of them are pretty self-explanatory.
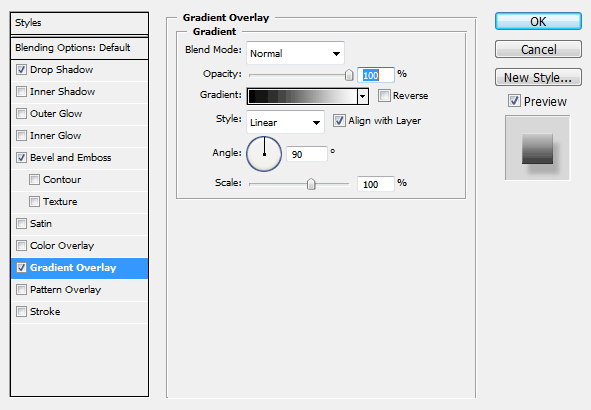
Now let’s add a Gradient Overlay.
Add a Gradient
By default, the Gradient Overlay will probably use a Foreground to Background gradient, which is not exactly what we are looking for (unless we’ve setup the Foreground and Background Colors in Photoshop specifically for this step). That’s OK though, because we can easily adjust the gradient from here.
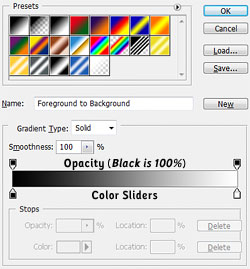
Photoshop\'s Gradient Editor
Click on the gradient shown in the Gradient Picker (Black fading to White in the above diagram). This will bring up the Gradient Editor. From the Gradient Editor, you may choose a gradient preset, or create a new custom gradient of your own. Towards the bottom of the editor is the current gradient, with Opacity Stops (Determine how opaque the gradient is at a specific point) and Color Stops (Determine what colors are used in the Gradient). We can add, delete, and modify stops by clicking anywhere above or below the gradient, or by clicking on the stops themselves.
We only want to modify the current color stops. Double Click the first color stop, and apply the color #50a2e7, and then apply the color #75cefc to the right most stop. Click OK to Apply the Gradient.
Click OK to apply the layer style you’ve created.
Posted by David Leggett in Photoshop Tutorials on June 06th, 2008